Wednesday, 30 April 2008

Uncover Reverse Osmosis Water Systems


What if I told you there are several types of water filtration systems on the market these days? With so many out there, it really makes it hard to choose which would be best for the home. The condominium I occupy had a reverse osmosis water system with changeable filters installed by the homeowner's association when the building was constructed over 25 years ago. I am very concerned about fitness, health and longevity, so I really decided to put this system to the test and see what it was all about. I really didn't know what a reverse osmosis water system did, so I happened onto the internet to see what information I could find out and decide if this was the best choice in water purity.


Reverse osmosis (RO) is a process by which pressure is used to force a solution through a semi-permeable membrane allowing passage of solvent but not solute. It's best known for being used for desalination (or removing the salt from sea water to make it fresh) however it has been used to purify things for the medical (dialysis), domestic and industrial (food industry, car washes, water plants) settings since the early 1970's.


In terms of drinking water purification, many homes use reverse osmosis systems as a common step for improving water for drinking, cooking and showering. This type of RO system includes several steps used to get water prepared for use. These included:


  • A trapping device (sediment filter) for removing rust and calcium carbonate
  • A secondary sediment filter with a finer openings
  • An activated carbon filter used to remove volatile and soluble organic chemicals along with chlorine which can breakdown the RO membranes
  • A RO filter/membrane
  • Sometimes an optional second carbon filter and finally
  • An ultra-violet lamp


This seemed like quite a few steps and rather expensive sounding too. Also, when I took the time to actually look at what else got removed with the toxins and sediment, I wasn't very impressed. Valuable minerals were removed from the water as well and I knew this was quite important to keep my body at a healthy balance. I didn't want my body becoming acidic or trying to strip minerals from other parts of the body such as teeth and bones. Plus, I would like to keep my organs for a long time to come and acidic water just isn't conducive to those conditions.


Some other disadvantages to a RO filtration for residential conditions were for every 5 gallons of useable water it would flush anywhere from 8-10 gallons that might get captured for watering the garden. It just seemed sort of wasteful if you ask me.


In conclusion, after much debate on my own part I decided to get rid of the reverse osmosis water system in my home. The disadvantages seemed to outweigh the positives, so in the end I selected a reasonably priced, multi-stage filtration system that included carbon, sub-micron filtering and ion exchange. I found did a much more thorough job in ridding the water in my home of nearly 99% of bacteria, viruses, germs, sediment, chemicals, drugs and anything else I could think of that could possibly come out of the faucets. So do yourself a favor, if health and longevity is paramount to you as well, compare and learn the same facts I did.


Laurel Tevolitz is a dedicated researcher of critical issues that affect health and well-being. Visit her water purification blog now at http://www.safewaterpurifier.com/pristinewater.htm to discover which water purification system she recommends after extensive research.


Article Source: http://EzineArticles.com/?expert=Laurel_Tevolitz
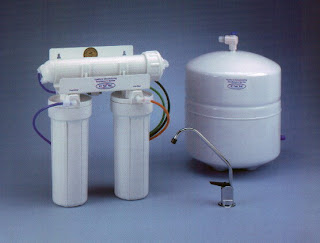
The Truth About Reverse Osmosis Water


Lets face it............we would have to be award winning chemists, to figure out just how our bodies react to the effects of drinking reverse osmosis water.


A simpler term would be distilled water. You probably have used it to water plants or used it in your steam iron, so it wouldn't leave rust stains on your clothes.


But how does the reverse osmosis home system turn ordinary tap water into distilled water? To put it simply, water is boiled, evaporated and the vapour condensed back to a fluid state. There, that's really all you need to know about the process. But what is the end result?


The end result is distilled water, which is free of dissolved minerals.

Studies have shown that distilled water has a special property of being able to absorb toxic substances from our bodies. They can then be eliminated in our urine. Not bad right?


Some studies have indicated that it may have a use in short term detoxification. A few weeks at a time may be ok.

But it is the long term effects that we need to take a closer look at.


The lack of minerals in reverse osmosis water may have some long term effects that may harm our bodies . Distilled water is even used in producing cola and other soft drinks.


Studies have shown that people who drink large amounts of soft drinks, have large amounts of calcium, magnesium and other trace minerals in their urine.


This is due to the acidic nature of distilled water. It pulls these minerals from our bodies in an attempt to balance the higher PH levels in our bodies due to the consumption of these products. Our bodies need these minerals to function properly!


Are you starting to get the picture here?

According to the U.S. Environmental Protection Agency, "Distilled water, being almost mineral free is very aggressive. Many metals are dissolved by distilled water. Carbon dioxide from the air is easily absorbed by distilled water making it even more aggressive.


Is this what we want to put into our bodies. Is the the reverse osmosis home system our best choice for water filtration? Let me go on to say that many reports that I have read, indicate that mineral loss contributes to a greater risk of diseases like osteoporosis, hypothyroidism and coronary artery disease.


Drinking reverse osmosis water may actually have an affect on how fast we age? I don't know about you, but I think there are better alternatives.


The ideal water for the human body should be slightly alkaline and this requires the presence of minerals like calcium and magnesium.


Distilled water tends to be acidic and can only be recommended as a way of drawing poisons out of the body. Once this is accomplished, the continued drinking of distilled water is a bad idea.


Water filtered through reverse osmosis tends to be neutral and is acceptable for regular use provided minerals are supplemented.


Water filtered through a solid charcoal filter is slightly alkaline. Ozonation of this charcoal filtered water is ideal for daily drinking. A combination of a charcoal filter, along with a sub-micron filter will not only make the water taste better, but remove not only chlorine and lead, but also many of the cancer causing chemicals that are introduced to our water supplies due to industrial practices of today.


In conclusion, the reverse osmosis home system, may not be our best choice for water filtration in our homes.


Longevity is associated with the regular consumption of hard water (high in minerals). Disease and early death is more likely to be seen with the long term drinking of distilled water.


Jim Riley is a passionate spokesman about the health benefits of purified drinking water. Visit his site now at http://www.safewaterpurifier.com/pure.htm to discover the purification system he endorses and why.


Article Source: http://EzineArticles.com/?expert=Jim_Riley

Tuesday, 29 April 2008

Guide To Hanging Wallpaper In Your Home

Hanging wallpaper can be an extremely complicated task, it's possible to get into a right mess if you're not careful! There are more complicated projects around your house, however that doesn't mean to say that it's a stress free job.


Before you can get onto actually hanging your wallpaper you actually need to buy it. You need to spend time choosing your wallpaper, there are hundreds of different types which you should choose from. If you want an easy project then I would suggest using wallpaper without any complicated patterns as you won't have to do as much matching up.


When you are choosing the type of wallpaper you should think about the type of room that you are buying it for. If it's for a kitchen then you should consider using vinyl coated wallpaper so that it can be wiped clean, it is also better for use within moist environments. Coated fabric is ideal for use in living rooms and bedrooms because it looks elegant and is breathable.


You need to make sure you order enough paper to do your whole room, this is where the measuring comes into it. Make sure you buy a few extra rolls just in case as the batch numbers can have slightly different colors. If you can't work out how many rolls you would need then you can use one of the many online calculators or ask for help in your local home hardware store.


Once you've selected the wallpaper you want to hang you need to make sure you have all of the necessary tools. You need a knife and scissors so that you can trim the paper to fit. You will also need to use a ruler and measuring tape, sponges and seam rollers are also really useful to work out any bubbles from the paper. Ladders and buckets are also important tools you might need.


Before you start to hang the wallpaper you need to prepare the walls. Remove all of the electrical sockets and light switches from the wall, clean the surfaces thoroughly to remove any stains or grease. It's also the right time to fill any holes in your wall and repair the surface of the wall.


You should choose where you want to start hanging the wallpaper, there are two things that you need to bear in mind when deciding where to start. Try to start in the shortest space so that any mismatches aren't as noticeable. A great place to start is in the corner behind a door.


When you've decided your starting spot you should draw a straight line down the wall, to do this you can use a plumb line. This allows you to line the paper up so that it's straight.


After all of that it's time to start hanging the paper. You can even buy pre-pasted paper so you don't have to paste it! If you buy standard paper then you will need to apply paste onto the back, you must be careful not to crease the paper.


Now start hanging your first strip of paper. Use the straight line to make sure everything is straight. Remove the bubbles by using a sponge and press the seams using a seam roller.


When you've hung the first strip then you can carry on hanging the rest of the paper. Use the slippiness of the paste to slip it around and move it into place, make sure you don't overlap the paper.


Eric Slarkowski very often creates short articles on things related to draperies. His comments on curtains can be encountered on http://www.curtains-drapes-coverings.com .


Article Source: http://EzineArticles.com/?expert=Eric_J._Slarkowski

A Guide to Buying a New Home


If you've decided to make the leap from renting a home to owning a home, you might be a little overwhelmed at the prospect of shopping for homes and applying for mortgage loans. While mortgage loans can seem a bit confusing at first, you'll find that they aren't nearly as bad as they might seem once you've taken the time to learn more about the mortgage loan process.


While this is by no means to be considered a complete list of everything that might come up while shopping for a new home, you'll find below a brief guide to the process of shopping for a home and applying for a mortgage loan.


Searching for a home

The first part of buying a new home is, obviously, finding the home to buy. While there are obviously a large variety of homes available on the market today, it's important to make sure that you stay within the range of what you can afford. After all, you're going to be making payments on your house for years... don't get in over your head before you even get started. You should also begin figuring how much of a down payment you're going to be able to make, since the larger your down payment is the lower your monthly payments will be.


Realtors vs. direct sellers

You may wonder whether it's better to buy a house that's up for sale from a realtor or one that's being sold directly from the homeowner. There are several factors that can be brought into consideration when comparing the two, but the bottom line is that the realtor has the financing contacts to help you along and knows the real estate business much better than you do. Discussing your options with realtors early on is also a great way to find out which properties are for sale as well as about how much the monthly payments on a mortgage will be for each.


Mortgages

When it comes time to take out a mortgage loan, you'll find a lot of options presented to you. The term of the mortgage can vary greatly, though most mortgages are for between 15 and 30 years. You also might have to choose from a variety of payment options ranging from standard payments to balloon payments in which you begin with smaller payments and have a larger sum to pay at the end.


You should also take into consideration other expenses such as closing costs, insurance, and taxes before deciding how much you can afford to borrow. A realtor or financial attorney can assist you in making these decisions as well as working you through the actual mortgage and purchase process.


Refinancing your mortgage

After you've been making payments for a few years and have paid off a significant portion of your mortgage, you might want to consider refinancing to make repayment of the remaining debt that much easier. Refinancing can allow you to use the equity that you've built up in your home to secure you a new loan, which is used to pay the outstanding balance on the original mortgage loan.


The refinancing loan will have a new loan term, a new (and hopefully lower) interest rate, and a much smaller amount to repay than the original mortgage, meaning that you'll be able to enjoy a reduction in your monthly payments. This can not only speed up paying off your house, but can also give you a little more money each month to do with as you please.


Paul Rogers writes general finance and loan articles for the Loans UK Online website at http://www.loansukonline.co.uk

Article Source: http://EzineArticles.com/?expert=Paul_Rogers

Monday, 28 April 2008

Basement Flooding & Water Removal


Do you have the flooded basement blues? Due to their nature, being underground structures, basements are prone to water damage. It doesn't take a river overflowing its banks or a major hurricane to flood a basement. In fact, basement flooding often occurs due to water build up in the surrounding soil.


So what's a home owner to do? Prevention is always the best medicine, especially when it comes to your home. As little as an inch of water can cause thousands of dollars of damage. Even small leaks can become major disasters when mold takes over. If your basement isn't flooded now, take the necessary precautions to prevent the most common basement flooding problems. You'll save yourself a great deal of heartache (and money) later.


First, if you have block walls, use a waterproof coating using the manufacturer's spread rate specifications. Don't skimp! You may even need a second coat if water seepage continues after the first application. Use a waterproof coating that is specifically formulated to block water passing through due to hydrostatic pressure.


What is hydrostatic pressure? This is pressure caused by water in the soil which could include the water table, rain runoff flowing toward your home underground, or even your home's own gutter system.


Other prevention steps include fixing leaks, ensuring proper drainage, and installing a sump pump. Leaks in the basement don't always originate down below. For example, if you have a leaking toilet above, where do you think the water is going to end up? Drip, drip, drip... down to the basement!


Remember that faulty gutter system? Is rainwater draining properly or is it collecting in the soil that's pressing against your basement walls? Make sure that your home's gutters are draining properly - away from the foundation and basement. Does the ground near your home slope away from it or toward it? Ideally, the ground should slope away. If not, consider grading the soil.


Sump pumps are increasingly being used as a preventative tool. In the past, sump pumps were used after flooding occurred. Now, many municipalities have restricted builders from routing rainwater from gutters to the sewer systems as they try to comply with the Clean Water Act. If the water isn't carried away from your foundation and basement, flooding can occur.


The sump pump acts to remove water from the lowest sections of the basement, even below the basement floor. A sump hole collects rising ground water. The sump pump kicks in when the water reaches a "critical" level and begins pumping the water out. The water is pumped through a pipe that diverts it away from your home's foundation and basement.


Many different types of sump pumps are on the market. Most use a "float" which activates the pump when the water reaches a certain level. Some are designed to work underwater while others are not meant to get wet. Different materials such as plastic and cast iron affect the price and long term performance of the pumps. In addition, sump pumps can be powered by either water or electricity.


Sump pumps should have a "check valve" to prevent water from flowing back in once the pumping is complete. Otherwise, the water will come right back in, trigger the sump pump, and create an endless pumping cycle. Choose the type of sump pump that best meets your needs and check it frequently to make sure that it's working properly.


What if it's too late and your home is already flooded? Help is just a click or two away. Let us help you dry out your basement and take care of any related mold issues. No matter where you live, a Dryout affiliate is ready to help. Simply fill out a brief form explaining the damage and a local representative will call you back right away.


Waterproofing A Basement In 4 Easy Steps


Waterproofing a basement involves doing a variety of things. You have to take certain steps to stop areas where leaking is occurring. In addition, you must be proactive about repairing areas such as cracks and holes before you get started in waterproofing. Some of the things you'll need to do are nullify leaky floor joints and make certain patches and repairs to your basement before you can completely waterproof it.


In this article, I will show you how to do all these things so you go about doing the job the correct way.


Many people consider waterproofing a basement because there are some spots that allow leaks and seepage into the basement. There are a variety of reasons why cracks, leaks and seepage occur. Usually it is a result of the house settling which causes the cracks. However, poor craftsmanship can be blamed. Sometimes it's just a matter of pressure -- too much water has built up on the outside and has forced its way through the walls.


First, you must find out where these leaks and seepage areas are. Most often you will find these areas to be where the floor and wall joins together, so if you're having leaks but are not sure where they are at, start looking at these joints first.


Usually leakage occurs because of cracks in the walls and floors. It is important that you seal these before you go about the process of waterproofing. It's simple to seal them -- just use a waterproofing compound. If the holes and cracks are larger than a quarter of an inch, you should patch them first, and then apply the mix.


Sometimes pressure from the water outside will be too much to simply repair the crack by sealing off. Instead, you may need to divert the pressure with a weep pipe. This will allow the water trapped against the wall to escape. You don't need to use it weep pipe for extended periods of time. Generally you can use it to temporarily drain the water pressure, which will then allow you to adequately fill the hole and seal it.


That's really all there is to it, when it comes waterproofing your basement. First it's a matter of finding the areas were seepage occurs, and then fill them. Of course, you want to make sure you know exactly how to fill them so that they are properly sealed.


You can find out more about Waterproofing A Basement as well as much more information and tips on everything to do with basement waterproofing at http://www.BasementWaterproofingTips.com


Article Source: http://EzineArticles.com/?expert=Terry_Edwards

Sunday, 27 April 2008

How To Select A Basement Waterproofing Contractor

If you have made the decision to have your leaky basement repaired and get rid of the water in the basement, then it's time to look at hiring a basement waterproofing contractor. The question then becomes, how do I find the best one? Here are some good tips to help.


Choosing the right contractor for the job is not something you want to do hastily. You will want to take your time and get several estimates for the job. Since basement waterproofing is a significant cost, get at least 3 estimates from various contractors before making any decision. Even getting as many as 5-6 is not unreasonable.


Where do you find a basement waterproofing contractor? You can start with family and friends of course. Perhaps they have used one for their wet basement in the past. There is nothing better than a firsthand experience to let you know about a particular contractor. Co-workers may also have some firsthand experience with their basements as well. You never know until you ask.


Next, you could check with the National Association of Waterproofing and Structural Repair Contractors (NAWSRC). Many contractors are members of this organization. In addition, they also have loads of information on basement waterproofing.


Finally, you can go through the Yellow Pages and call the contractors you find there.


Now that you have your list it's time to schedule them to come out and give estimates on your wet basement. One of the most important things you will want to do is get a list of references. Check some of them out and get an idea of their quality of work. Ask questions when they are there. How long have they been doing this type of work? How long will the job take? Will they be working full-time on your home only, or will they be doing other jobs as well? You certainly do not want your basement torn up and have to wait a month while the company completes other jobs in the meantime.


Also, make sure you get a waterproofer that offers a transferable 30 year - lifetime warranty. Then, get a written estimate from them and look over the fine print. The estimate should include details on everything the contractor will do, costs, and the amount of time to complete the job.


Finding a basement waterproofing contractor isn't difficult by itself, but finding the right one who is reputable and does quality work will take a little effort on your part. The results though, will be more than worth it. You'll be enjoying a dry basement for many years to come.


You can find out more about how to find a Basement Waterproofing Contractor as well as much more information and tips on everything to do with basement waterproofing at http://www.BasementWaterproofingTips.com


Article Source: http://EzineArticles.com/?expert=Terry_Edwards

Waterproofing Basement Walls - Do It Yourself Or Leave It To The Pros?

If you plan on building your basement into utilized living space, you must be sure you do not have a damp basement, or worse yet, a leaky basement. If you have any moisture at all coming inside you'll need to consider waterproofing basement walls before beginning construction. The question then becomes whether to do the work yourself or hire a professional waterproofing contractor.

Unless you have several basement leaks, a flooded basement or other more serious foundation issues, you may be able to do the work yourself and come out with a dry basement. Now, if you do have severe water problems in your basement then don't even think of doing the work yourself. Get several bids from professional contractors and have them waterproof the basement professionally. You will be very happy you did.


To get started on doing the work yourself, you'll first want to do a visual inspection. Where is the moisture or water in the basement coming from? The most common cause is through cracks in the walls and foundation, but there can be other reasons as well. Believe it or not, I had a friend who complained of having water in the basement and it turned out to be the excess condensation from his air conditioner that caused it! This is why you want to get to the root source of the problem first.


Before waterproofing basement walls you will want to have a smooth clean surface. Clean off any dirt and remove loose mortar or excess concrete from the walls.


Next, repair any cracks where the water was coming in. Fill them with quick dry cement designed for basement walls.


Finally, waterproof the walls with a concrete waterproofing paint. This is a unique and special paint, not a regular gallon of latex. You will want to apply at least two coats to the walls to keep the moisture out. While this method does work, it may not in all situations. You may find that you will still need to waterproof the basement with a professional system. But, this is a very inexpensive and quick way of protecting your walls that may provide the solution you need.


You can find out more about Waterproofing Basement Walls as well as much more information and tips on everything to do with basement waterproofing at http://www.BasementWaterproofingTips.com


Article Source: http://EzineArticles.com/?expert=Terry_Edwards

Waterproofing A Basement - What You Need To Know

Wet basements are more than just a headache for millions of homeowners everywhere; they are also a source of major problems from basement mold to foundation cave-ins. This is why waterproofing a basement that leaks are extremely important.

Being able to utilize your basement has never been more popular with homeowners. It's basically "free" square footage that can greatly enhance the value of any home, as well as give your family added rooms to live in.


When it comes to waterproofing a basement, you have a couple of different options:

-You can do it yourself.

-You can hire a professional waterproofing contractor.


Do It Yourself

Going the do-it-yourself route may work with minor basement leaks in the walls. But if you are experiencing a flooded basement whenever it rains or have water coming in through multiple cracks in the walls or foundation, and then doing it yourself will not be a good option.


If you are going to do the job yourself, be sure to prepare the walls first. Brush off loose mortar, dirt and other contaminants.


Next, take a wire brush and get rid of old paint. Then patch cracks with a concrete patch designed for basements.


Finally, get a good quality waterproof coating to apply on the surfaces. You will need to apply a minimum of 2 coats and in some cases 3 coats. Don't just apply one coat. The basement will undoubtedly begin leaking again with a heavy rain.


Hiring A Waterproofing Contractor

If your basement leaks in several places or floods during a rain, you will need to hire a professional contractor to waterproof the basement for you.


The thing to keep in mind here is that not all waterproof companies are the same, and the lowest bid may not always be the best option. I talk about this in detail in another article on the website.


Waterproofing a basement and eliminating the problem isn't as difficult as it may first appear. Once you assess the problem and determine how extensive the leaks are, you can then take the necessary steps to fix it and have a completely dry basement.


You can find out more about Waterproofing A Basement as well as much more information and tips on everything to do with basement waterproofing at http://www.BasementWaterproofingTips.com


Article Source: http://EzineArticles.com/?expert=Terry_Edwards

Easy Tips for Decorating Small Apartments

Whenever you are decorating a small apartment, there are often two major concerns. The primary focus is almost always to give the impression that the room is larger than it actually is. Secondly, because you are renting, to be careful of any changes you are making.


An important point to remember while decorating small apartments is to always consult the landlord first. Being the primary decision-maker of the property, the landlord may or may not consent to any redecorating ideas that you may have. When you are denied painting or making significant changes, remember that you can always create a new feel for the place without distressing your landlord too greatly. It is imperative to get approval from the landlord before getting started on your project!


Whenever your landlord does not agree to your painting the apartment, you can often improve the character of a room simply by allowing your persona to shape your choices in décor. For instance, as you are decorating a small apartment, hang up old photos or graphic art on the walls. One option is to go to a flea-market and buy reasonably-priced, unfinished picture frames and paint or varnish them yourself. Posters, woven rugs, and mosaics can produce the essence of your spirit while adding color and flare to the apartment.


Fortunately, most apartments originally are painted in subtle colors. Consequently, while decorating a small apartment, don't worry about altering the color since these colors will create the impression of larger rooms. Remember that attempting to crowd the room with too many effects will only cause the room to feel cramped. My suggestion is to select furnishings that fit the dimensions of the room. This allows you to be at ease in your surroundings while maintaining a stylish appearance!


To learn more about decorating your home while staying within your decorating budget, download a free copy of the ebook "Budget Home Decorating Tips". Download it free here: Budget Home Decorating Tips.


Lynn Cressy has a love for decorating and shopping for home decor. She owns a home decor web site and writes articles on home decorating and organizing your home and your life.


Article Source: http://EzineArticles.com/?expert=Lynn_Cressy

How To Choose The Right Marble Or Granite For Your Home

Many people have decided to use marble or granite in their home interior ideas. These stones have a way of adding a certain beauty to our surroundings. Each with it's own texture and color shades, they have been used in many of our home improvement projects. Even though these stones are beautiful, do we know enough about them to place them in the proper places of our homes? Do we know the differences that are presented from one type of stone to the next? Here we will look at some of these different aspects of each stone.


Granite is a hard stone that is very durable. Granite is mostly made up of quartz and mica. This stone is considered to be igneous. The color and texture of the stone is determined the cooling speed and the amount of quartz and mica that are found in each piece of stone.


The pros and cons of granite stone

Granite is considered one of the best stones to use in your home. The reasoning behind this lies within the fact that granite is scratch resistant. Other properties of this magnificent stone is that it does not stain, chip or burn. These properties alone, make this one of the most commonly used stones in todays' homes. They have a great color to them and add a nice beauty to the surrounding area. Using granite poses no threats to any problems such as sanitation or health as long as it is cleaned regularly.

As for any cons to using granite, there really is not any bad side to using this stone in your home. With the above mentioned properties, it is no wonder that granite is so popular among homeowners.


The pros and cons of marble stone

Marble unlike granite is not scratch resistant. As a matter of fact, marble is very easy to scratch. Marble is also very easy to stain. If using marble in your kitchen areas, then you want to be careful as this type of stone is susceptible to burns. Also heat can be a major disadvantage to using marble. Heat can also damage the allure of marble as well as any stains that may be found on this stone.


As for pros with using marble, there really isn't any beyond the fact that this stone is great to gaze upon. The smoothness of marble is so remarkable that many famous sculptures have been formed from this magnificent stone.


When it comes to using either one of these stones in your interior design ideas, there are virtually limitless possibilities. Many people love the look of these stones in their kitchens. Used for counter tops and even dining tables and end tables for their living room. Maybe one section of the wall could be made out of this stone material. The bathroom is another great place to employ the use of this beautiful stone. This will add elegance and sophistication into your home. The possibilities that can be achieved by using this stone is virtually limitless and will be a great addition to your home.


Looking for a quality marble or granite supplier? Browse through the many different types of marble and granite in Wisconsin's premier stone supplier, Halquist Stone’s 10,000 sq. foot show room. For more information, call (262) 246-9000 or visit http://www.halquiststone.com to request a free brochure.


Article Source: http://EzineArticles.com/?expert=Katie_Buyer